Ultimate Guide to Installing Python, TensorFlow, and Jupyter Lab on Windows
A Complete Setup Guide for Beginners to Install Python, TensorFlow, and Jupyter Lab Correctly with Best Practices, Commands, and Troubleshooting for Windows Users.
Setting up Python, TensorFlow, and Jupyter Lab on Windows is often the first challenge every beginner faces when stepping into the world of Machine Learning, Data Science, Deep Learning, Generative AI and AI development.
Many students and professionals struggle hours dealing with version conflicts, environment issues, or TensorFlow installation failures — especially on Windows systems.
In this detailed article, I will walk you through a clean, simple, and structured approach to setting up Python (TensorFlow-compatible version), installing TensorFlow (latest or specific versions), configuring Jupyter Lab, creating kernels, and most importantly — verifying everything step-by-step.
This guide is crafted specifically for those who want to avoid Virtual Environments and want to install everything directly on Windows.
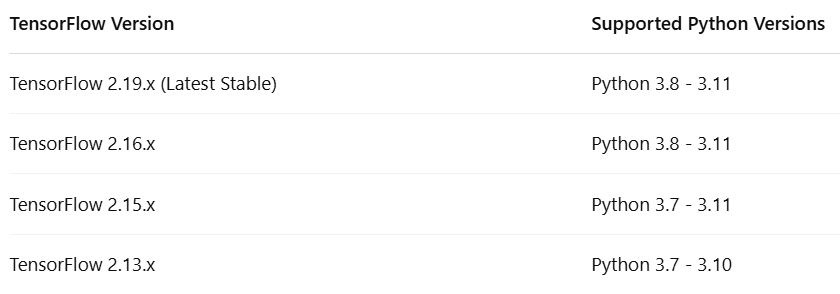
1) Python Installation — TensorFlow Compatibility Notes
Note: Python 3.12.x and Python 3.13.x are NOT supported for TensorFlow as of April 2025.
Steps to Install Python (for TensorFlow Compatibility):
Download Python 3.10.x from official site:
https://www.python.org/downloads/release/python-3100/During Installation:
Tick
Add Python to PATHSelect
Install for All Users(Optional)
Verify Installation:
python --version2) TensorFlow Installation
Upgrade pip (Always Recommended)
python -m pip install --upgrade pipInstall Latest TensorFlow Version
pip install tensorflowInstalling a Specific TensorFlow Version:
Syntax:
pip install tensorflow==<version>Examples:
pip install tensorflow==2.15.0
pip install tensorflow==2.13.0
Verify TensorFlow Version
import tensorflow as tf
print(tf.__version__)
3) Jupyter Lab Installation (In TensorFlow Supported Python)
pip install jupyterlab ipykernel4) Create Kernel for Jupyter Lab
python -m ipykernel install --user --name py310 --display-name "Python 3.10 (TensorFlow)"5) Useful Commands
a) Checking Python Version
python --versionor Inside Python:
import sys
print(sys.version)
print(sys.executable)
b) Checking Installed Python Versions in Windows
where pythonc) Checking TensorFlow Version
import tensorflow as tf
print(tf.__version__)
pip show tensorflowd) Checking Jupyter Lab Version
jupyter lab --versionor in Python:
import jupyterlab
print(jupyterlab.__version__)
or to list all Jupyter related packages:
pip list | findstr jupytere) Running Jupyter Lab from Command Prompt
jupyter labf) Changing Kernel in Jupyter Lab
In Jupyter Lab Interface:
Kernel → Change Kernel → Select "Python 3.10 (TensorFlow)"g) Uninstalling Jupyter and Jupyter Lab (Clean Removal)
pip uninstall notebook jupyter jupyterlabh) List All Installed Python Packages
pip listi) Check Active Python in Notebook
import sys
print(sys.executable)
print(sys.version)
j) Check TensorFlow Installed Correctly
import tensorflow as tf
print(tf.__version__)
print("TensorFlow Installed Successfully!")
6) Best Practices & Recommendations
Final Summary Flow
Additional Note — Recommended for Professional Setups:
In this article, I have explained how to install Python, TensorFlow, and Jupyter Lab directly in your Windows environment (without virtual environments) for simplicity and quick setup.
However, in real-time projects or when working on multiple machine learning or AI projects — it is highly recommended to use Virtual Environments.
This will help you:
Create isolated environments for each project.
Install different versions of Python or TensorFlow without impacting the global system.
Easily manage dependencies and avoid version conflicts.
Steps to Create Python Virtual Environment on Windows
Step 1: Check Available Python Versions
where pythonStep 2: Create Virtual Environment
Syntax:
python -m venv <env_name>Example:
python -m venv tf_envThis will create a new folder called tf_env containing the isolated Python environment.
Step 3: Activate Virtual Environment
Windows Command Prompt:
tf_env\Scripts\activateYou will see:
(tf_env) C:\Users\YourName>Step 4: Install TensorFlow in Virtual Environment
pip install --upgrade pip
pip install tensorflow
or for specific version:
pip install tensorflow==2.15.0Step 5: Install Jupyter Lab in Virtual Environment
pip install jupyterlab ipykernelStep 6: Create Kernel for Jupyter Lab
python -m ipykernel install --user --name tf_env --display-name "Python (TensorFlow Env)"
Step 7: Run Jupyter Lab
jupyter labStep 8: Deactivate Virtual Environment (After Work)
deactivateFinal Suggestion:
If you are working on a single learning project — you can directly install Python + TensorFlow + Jupyter Lab (as explained in this article).
But if you are working on multiple projects or handling production environments — using Virtual Environments is the industry-standard approach.
Conclusion
Hope this article helped you in setting up your Python + TensorFlow + Jupyter Lab environment hassle-free on Windows.
Feel free to bookmark this article and share it with your friends, colleagues, or students who are starting their journey in Machine Learning or AI Development.
If you found this useful:
Follow me for more such practical guides on AI, ML, DL, Generative AI, Azure AI, AWS AI, Google AI, Python, and Tech.
Comment below if you faced any other issues — I will be happy to help!
Stay connected for my upcoming articles where I will cover:
Hands-on Machine Learning Projects using TensorFlow
Python Coding Best Practices
AI Learning Roadmap for Students & Professionals
For more in-depth technical insights and articles, feel free to explore:
Girish Central
LinkTree: GirishHub – A single hub for all my content, resources, and online presence.
LinkedIn: Girish LinkedIn – Connect with me for professional insights, updates, and networking.
Ebasiq
Substack: ebasiq by Girish – In-depth articles on AI, Python, and technology trends.
Technical Blog: Ebasiq Blog – Dive into technical guides and coding tutorials.
GitHub Code Repository: Girish GitHub Repos – Access practical Python, AI/ML, Full Stack and coding examples.
YouTube Channel: Ebasiq YouTube Channel – Watch tutorials and tech videos to enhance your skills.
Instagram: Ebasiq Instagram – Follow for quick tips, updates, and engaging tech content.
GirishBlogBox
Substack: Girish BlogBlox – Thought-provoking articles and personal reflections.
Personal Blog: Girish - BlogBox – A mix of personal stories, experiences, and insights.
Ganitham Guru
Substack: Ganitham Guru – Explore the beauty of Vedic mathematics, Ancient Mathematics, Modern Mathematics and beyond.
Mathematics Blog: Ganitham Guru – Simplified mathematics concepts and tips for learners.


