
Getting Started with Django: A Simple Guide to Building Your First Web App

Here’s a step-by-step guide to kickstart a Django project, covering everything from Python installation to running the Django development server and testing a simple homepage. Let’s get started!
Step 1: Install Python
Download Python: Go to the Python official website and download the latest version.
Install Python: Follow the installation instructions for your operating system. Be sure to check “Add Python to PATH” during installation.
To verify the installation, open your terminal or command prompt and type:
python --versionStep 2: Create a Virtual Environment
Creating a virtual environment is a good practice as it isolates your project dependencies.
Navigate to Your Project Folder: In the terminal, navigate to the folder where you want to create your Django project.
Create Virtual Environment: Run the following command to create a virtual environment named
venv:python -m venv venvActivate Virtual Environment:
Windows:
venv\Scripts\activateMacOS/Linux:
source venv/bin/activate
Once activated, your terminal prompt will change to indicate you’re in the virtual environment.
Step 3: Install Django
With the virtual environment activated, install Django using the following command:
pip install djangoVerify the installation by checking the Django version:
django-admin --versionStep 4: Create a Django Project
Create Project: Use the
django-admincommand to start a new Django project namedmyproject:django-admin startproject myprojectProject Structure: This command creates a folder named
myprojectwith the following structure:myproject/ ├── manage.py └── myproject/ ├── __init__.py ├── settings.py ├── urls.py ├── asgi.py └── wsgi.py
Step 5: Create a View in views.py
Create an App: Inside
myproject, create an app calledmyapp(you can use a different name if you prefer):python manage.py startapp myappDefine the View:
Open the
myapp/views.pyfile and add a view function namedhometo render the homepage template:# myapp/views.py from django.shortcuts import render def home(request): return render(request, 'home.html')
Step 6: Set Up the Template Folder and home.html
Create a Templates Folder: Inside
myapp, create a folder namedtemplatesto store HTML templates.Create
home.html: Insidetemplates, create a file namedhome.htmland paste the following code for the homepage:<!DOCTYPE html> <html lang="en"> <head> <meta charset="UTF-8"> <meta name="viewport" content="width=device-width, initial-scale=1.0"> <title>Ebasiq Home</title> <style> /* Basic styling for layout and elements */ * { margin: 0; padding: 0; box-sizing: border-box; } /* Set the page container to flex with column layout */ body, html { display: flex; flex-direction: column; min-height: 100vh; /* Full viewport height */ font-family: Arial, sans-serif; background-color: #f0f8ff; /* Light blue background */ } /* Header section */ header { background-color: #003366; /* Dark blue */ color: #fff; padding: 10px 20px; text-align: center; } header h1 { margin: 0; } /* Navigation menu */ nav ul { list-style-type: none; margin: 0; padding: 0; display: flex; justify-content: center; background-color: #00509e; /* Medium blue */ } nav ul li { margin: 0 10px; } nav ul li a { color: #fff; text-decoration: none; padding: 10px 15px; display: block; } nav ul li a:hover { background-color: #007bff; /* Light blue for hover effect */ color: #fff; } /* Main content */ .content { flex: 1; /* Pushes footer to the bottom */ padding: 20px; text-align: center; color: #003366; /* Dark blue text for headings */ } .content h2 { color: #003366; } /* Course boxes */ .courses { display: flex; justify-content: space-around; margin-top: 20px; } .course-box { width: 30%; padding: 20px; background-color: #e6f2ff; /* Light blue for course boxes */ border-radius: 8px; box-shadow: 0 0 10px rgba(0,0,0,0.1); color: #003366; } .course-box h3 { margin: 0; color: #00509e; } /* Footer styling */ footer { background-color: #003366; color: #fff; text-align: center; padding: 10px 20px; } footer a { color: #00aaff; /* Lighter blue for links */ text-decoration: none; } footer a:hover { color: #fff; } </style> </head> <body> <!-- Header with brand name --> <header> <h1>Ebasiq</h1> <p>Your go-to source for mastering AI, Python, Data Science, and more!</p> </header> <!-- Navigation menu --> <nav> <ul> <li><a href="#">Home</a></li> <li><a href="#">Courses</a></li> <li><a href="#">About Us</a></li> <li><a href="#">Blog</a></li> <li><a href="#">Contact Us</a></li> </ul> </nav> <!-- Main content area --> <div class="content"> <h2>Welcome to Ebasiq</h2> <p>At Ebasiq, we offer courses designed to empower you with practical, hands-on skills in the latest technologies.</p> <!-- Course section with three boxes --> <div class="courses"> <div class="course-box"> <h3>Python from Basics to Advanced</h3> <p>Master Python programming with our comprehensive course.</p> </div> <div class="course-box"> <h3>Machine Learning Essentials</h3> <p>Get a solid foundation in machine learning and its applications.</p> </div> <div class="course-box"> <h3>Data Science with Python</h3> <p>Learn how to analyze data and make data-driven decisions.</p> </div> </div> </div> <!-- Sticky footer --> <footer> <p>© 2024 Ebasiq. All rights reserved.</p> <p>Follow us on: <a href="#">LinkedIn</a> | <a href="https://www.instagram.com/ebasiq">Instagram</a> | <a href="https://www.youtube.com/@ebasiq153">YouTube</a> </p> </footer> </body> </html>
Step 7: Configure URLs
Edit
urls.pyin the Project Folder:Open
myproject/urls.pyand import thehomeview frommyapp.views.Add a URL pattern to route the root URL (
/) to thehomeview.
# myproject/urls.py
from django.contrib import admin
from django.urls import path
from myapp import views  # Import views from the app

urlpatterns = [
    path('admin/', admin.site.urls),
    path('', views.home, name='home'),  # Link root URL to home view
]
Step 8: Run the Development Server
Run the development server to test your setup:
python manage.py runserverStep 9: Test the Application
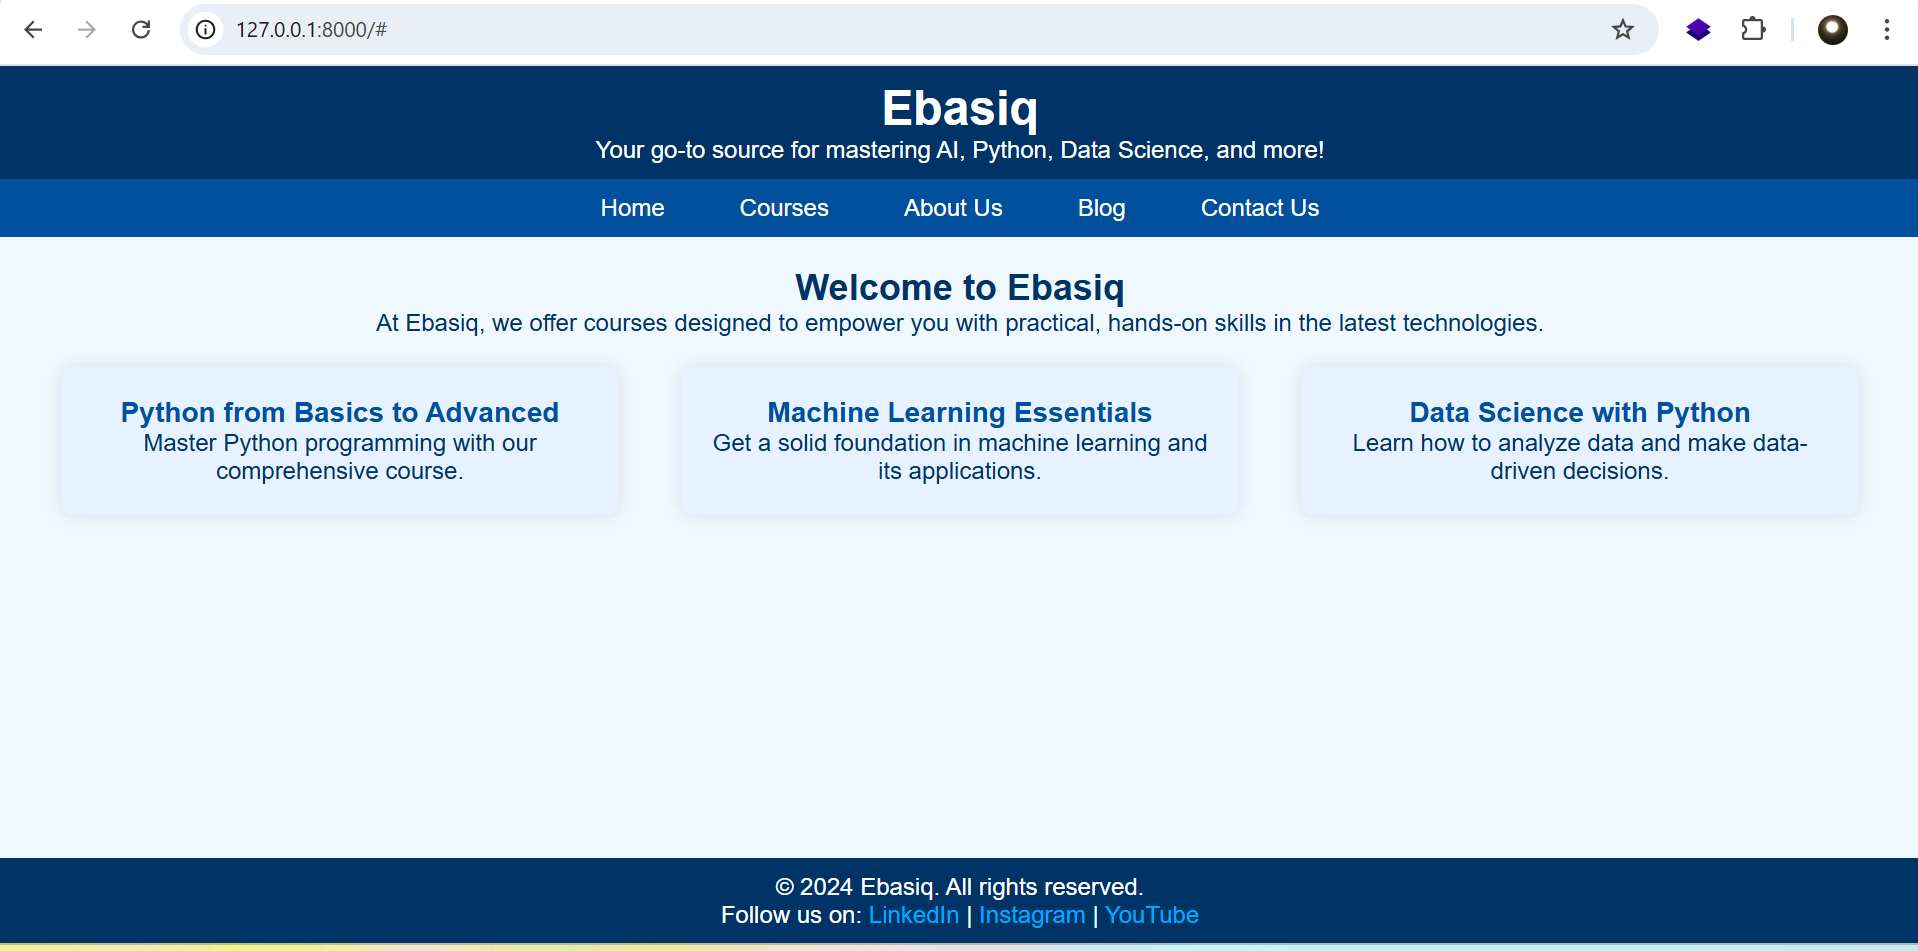
Open your browser and go to http://127.0.0.1:8000/. You should see the homepage you created in home.html.
After following the setup steps, your final Django project folder structure will look something like this:
myproject/
├── manage.py                # Command-line utility for Django project
├── myproject/               # Main project folder (project configuration)
│   ├── __init__.py          # Indicates this directory is a Python package
│   ├── asgi.py              # ASGI configuration for async applications
│   ├── settings.py          # Project settings and configurations
│   ├── urls.py              # Project-level URL definitions
│   └── wsgi.py              # WSGI configuration for deployment
└── myapp/                   # Django app (contains views, models, templates)
    ├── migrations/          # Database migrations for the app
    │   └── __init__.py
    ├── __init__.py          # Indicates this directory is a Python package
    ├── admin.py             # Admin configuration for the app
    ├── apps.py              # App configuration
    ├── models.py            # Database models
    ├── tests.py             # Tests for the app
    ├── views.py             # Views for handling requests and responses
    └── templates/           # Folder for HTML templates
        └── home.html        # Template for the homepage
venv/                        # Virtual environment (contains Django and dependencies)
Explanation of Key Components
myproject/(Main Project Folder):manage.py: Django’s command-line utility to interact with the project (run the server, make migrations, etc.).myproject/(Project Configuration):settings.py: Contains all configuration settings, like installed apps, middleware, database settings, and more.urls.py: Routes URLs to their respective views within the project.asgi.pyandwsgi.py: Configuration files for deploying Django on ASGI (asynchronous) and WSGI (synchronous) servers.
myapp/(App Folder):migrations/: Auto-generated database migration files.admin.py: Configuration for adding models to the Django admin interface.models.py: Contains classes for defining database structure.views.py: Contains view functions to handle requests and return responses.templates/: Folder to store HTML templates, likehome.htmlfor the homepage.
venv/: Virtual environment folder (contains Python and Django packages), isolated from global Python packages for better dependency management.
This structure follows Django’s conventions, keeping the project organized and scalable. Each app within the project can have its own models.py, views.py, templates/, and other files, making it easy to add more features to the project.
Web Application Preview
Understanding the Difference Between a Django Project and an App
In Django, the terms project and app refer to two distinct parts of your application setup:
1. myproject (The Project)
Definition: A project is the overarching configuration for your entire web application. It contains settings and configurations that apply to the entire application.
Purpose: The project serves as a container that holds multiple apps, manages global settings, and configures URLs that may link to different apps.
Key Components:
settings.py: Holds configuration for the whole project, including database settings, installed apps, middleware, and templates.urls.py: Defines the project's URL patterns, acting as a “roadmap” that connects specific URLs to views within different apps.wsgi.pyandasgi.py: Configuration files for deploying the project in various server environments (WSGI for synchronous servers and ASGI for asynchronous servers).
A Django project often contains multiple apps, allowing you to divide functionality across reusable modules.
2. myapp (The App)
Definition: An app is a smaller, modular component within a Django project. Each app is a self-contained module that performs a specific function or serves a particular feature.
Purpose: Apps encapsulate specific functionalities, such as managing blog posts, handling user authentication, or managing a shopping cart in an e-commerce site. You can add, remove, or reuse apps across multiple projects.
Key Components:
models.py: Defines the app's data models and database schema.views.py: Contains view functions that handle requests and return responses for specific pages within the app.urls.py(optional): If needed, each app can have its own URL configuration, allowing you to map URLs directly to views within the app.templates/: Stores HTML files specifically for this app’s views.
Apps are designed to be modular, making them reusable and flexible. You can create multiple apps within a single project or even reuse the same app in different projects.
Stay Curious! Share the Knowledge
Ready to build your first web application with Django? Follow these steps and watch your project come to life! Don’t forget to experiment and explore beyond the basics to make your app unique. If you found this guide helpful, share it with others and keep following along for more tutorials to enhance your Django skills!
For more in-depth technical insights and articles, feel free to explore:
LinkTree: LinkTree - Ebasiq
Substack: ebasiq by Girish
YouTube Channel: Ebasiq YouTube Channel
Instagram: Ebasiq Instagram
Technical Blog: Ebasiq Blog
GitHub Code Repository: Girish GitHub Repos
LinkedIn: Girish LinkedIn