


Build a Full-Stack Website (Course App Example) using Django, Bootstrap & FastAPI
Learn to combine Django for admin & HTML, FastAPI for REST APIs, and Bootstrap for styling — all in one modern project.

This tutorial walks you through building a full-stack web application using Django for HTML rendering and FastAPI for REST APIs — all in one project using Django ORM and SQLite.
Folder Structure
To build a unified Full-Stack Web App using Django (for HTML rendering and Admin) and FastAPI (for REST APIs), we organize the project into clear, modular directories. Each folder plays a distinct role:
courses/handles Django views, models, templates, and static UI assets.api/manages all FastAPI-related logic, including route handlers and Pydantic models.course_project/serves as the core Django project configuration, with settings and ASGI integration.
This hybrid structure enables you to combine Django's monolithic strengths with FastAPI's microservices-style API power — in a clean and maintainable way.
course_project/
├── api/                     # FastAPI app for API functionality
│   ├── __init__.py          # Makes 'api' a Python package
│   ├── main.py      # FastAPI entry point with app and route definitions
│   └── models.py    # Pydantic models for request/response schema validation
│
├── courses/         # Django app for handling courses (HTML views, templates)
│   ├── templates/           # HTML templates used for rendering UI pages
│   │   ├── course_list.html # Template to display the list of courses
│   │   └── index.html       # Home page template (landing page)
│   │
│   ├── static/      # App-level static files (not copied automatically)
│   │   ├── css/
│   │   │   └── style.css    # Sample CSS styling file
│   │   ├── js/
│   │   │   └── main.js      # Sample JavaScript file
│   │   └── images/
│   │       └── logo.png     # Sample image file (e.g., logo or banner)
│   │
│   ├── __init__.py          # Makes 'courses' a Python package
│   ├── admin.py             # Registers models with Django Admin
│   ├── apps.py              # Django app config file
│   ├── forms.py             # (Optional) Django forms, if needed
│   ├── models.py            # Django model definitions for Course
│   ├── urls.py              # URL routing for Django views
│   ├── views.py             # Django views to render templates
│   └── tests.py             # Unit tests for the 'courses' app
│
├── course_project/          # Main Django project configuration
│   ├── __init__.py          # Makes 'course_project' a Python package
│   ├── asgi.py       # ASGI config — needed for FastAPI + Django ASGI support
│   ├── settings.py   # Main Django Pro settings (DB, apps, static config)
│   ├── urls.py              # Routes requests to apps and includes
│   └── wsgi.py  # WSGI config, used for traditional Django deployment (optnal)
│
├── staticfiles/ # Output folder for collected static files (via collectstatic)
│   ├── admin/               # Auto-generated static assets for Django Admin
│   ├── css/
│   │   └── style.css        # Collected global/static CSS file
│   ├── js/
│   │   └── main.js          # Collected JavaScript file
│   └── images/
│       └── logo.png         # Collected image file
│
├── db.sqlite3               # SQLite database file (default DB for Django)
└── manage.py          # Django CLI tool (runserver, migrations, shell, etc.)
Step-by-Step Setup
Initialize Django Project and App
django-admin startproject course_project
cd course_project
python manage.py startapp courses
Update INSTALLED_APPS in settings.py
# course_project/settings.py
INSTALLED_APPS = [
    ...
    'courses',
]
Django Model using Django ORM
The courses/models.py file defines the data structure of your application using Django's ORM (Object-Relational Mapping). Each class in this file represents a table in the database, and each class attribute maps to a column. By defining the Course model here, you're enabling Django to automatically generate the corresponding database schema (like courses_course table in SQLite). This file plays a crucial role in handling database operations like creating, retrieving, updating, and deleting course records.
# courses/models.py
from django.db import models

class Course(models.Model):
    title = models.CharField(max_length=100)
    description = models.TextField()
    duration = models.CharField(max_length=50)
    price = models.DecimalField(max_digits=10, decimal_places=2)

    def __str__(self):
        return self.title


    def __str__(self):
        return self.title
Run migrations:
python manage.py makemigrations
python manage.py migrate
Create Django HTML Template
Create HTML Template in templates/
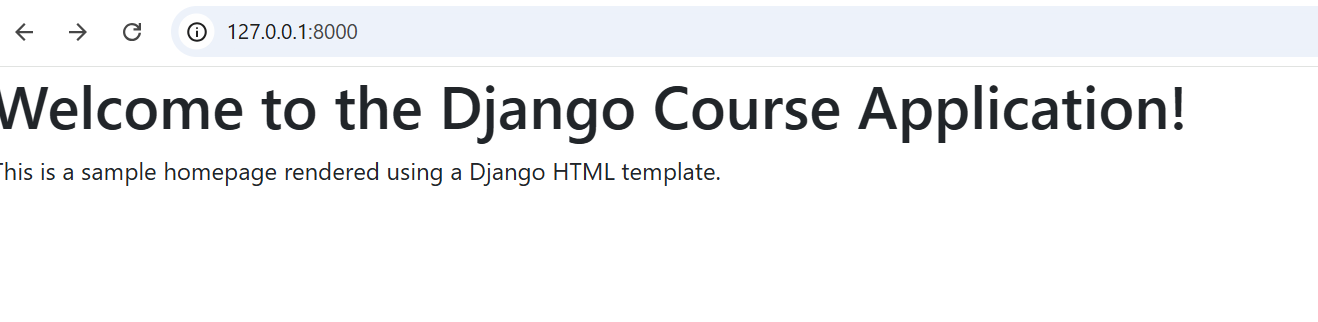
Add templates/index.html with basic HTML content.
templates/index.html
<!-- courses/templates/index.html -->
<!DOCTYPE html>

<html lang="en">
<head>
    <meta charset="UTF-8">
    <title>Django Course Home</title>
    <link href="https://cdn.jsdelivr.net/npm/bootstrap@5.3.0/dist/css/bootstrap.min.css" rel="stylesheet">

</head>
<body>
    <h1>Welcome to the Django Course Application!</h1>
    <p>This is a sample homepage rendered using a Django HTML template.</p>
</body>
</html>
Configure TEMPLATES in settings.py
In course_project/settings.py, make sure the TEMPLATES setting includes this configuration.
settings.py
# course_project/settings.py
import os

TEMPLATES = [
    {
        "BACKEND": "django.template.backends.django.DjangoTemplates",
        'DIRS': [BASE_DIR, 'templates'],  # ✅ Add this line
        "APP_DIRS": True,
        "OPTIONS": {
            "context_processors": [
                "django.template.context_processors.request",
                "django.contrib.auth.context_processors.auth",
                "django.contrib.messages.context_processors.messages",
            ],
        },
    },
]
course_list.html
<!-- courses/templates/course_list.html -->

<!DOCTYPE html>
<html>
<head>
    <title>Course List</title>
    <link href="https://cdn.jsdelivr.net/npm/bootstrap@5.3.0/dist/css/bootstrap.min.css" rel="stylesheet">

</head>
<body>
    <h1>Available Courses</h1>
   <div class="container mt-4">
  <h2 class="text-primary">Available Courses</h2>
  <ul class="list-group">
    {% for course in courses %}
      <li class="list-group-item">
        <strong>{{ course.title }}</strong> — ₹{{ course.price }}
        <br><small>{{ course.duration }}</small>
      </li>
    {% endfor %}
  </ul>
</div>

</body>
</html>
Create Django View
The courses/views.py file contains the controller logic of your Django app. It connects your data (models) with the user interface (templates). Each function inside this file is called a view, which takes an HTTP request, processes data (like fetching all courses from the database), and returns an HTTP response (usually rendering an HTML page). This is where you define how your web pages behave and what data they display to users.
# courses/views.py
from django.shortcuts import render

from .models import Course

def home(request):
    return render(request, 'index.html')

def course_list(request):
    courses = Course.objects.all()
    return render(request, 'course_list.html', {'courses': courses})
Django URLs
The courses/urls.py file defines the URL patterns for the courses Django app. It maps URL paths (like /courses/) to corresponding view functions. This allows you to organize and modularize your routing logic separately for each app. You include this file in the project's main urls.py to ensure the application knows how to respond to incoming HTTP requests for specific URLs.
# courses/urls.py  – Routing for Django App

from django.urls import path
from .views import course_list
from courses import views  # ✅ Import the view
urlpatterns = [
    path('admin/', admin.site.urls),
    path('', views.home, name='home'),  # ✅ Set root path to index.html view
    path('course-list/', views.course_list, name='course_list'),
]
The course_project/urls.py file serves as the central URL configuration for your Django project. It routes incoming requests to the appropriate app-level urls.py (like the one in the courses app). Think of it as the master switchboard that connects various parts of your Django project and defines admin URLs, homepages, and app-specific routes.
This is where you typically include:
Django Admin panel path
App-specific route inclusion (like
courses/urls.py)Other global paths (like the homepage or static views)
# course_project/urls.py – Main URL Dispatcher

from django.contrib import admin
from django.urls import path
from django.urls import path, include
from courses import views  # your Django HTML view


urlpatterns = [
    path("admin/", admin.site.urls),
    path('', include('courses.urls')),
    path('', views.home, name='home'),  # Homepage as HTML
]

from django.conf import settings
from django.conf.urls.static import static

urlpatterns += static(settings.STATIC_URL, document_root=settings.STATIC_ROOT)
Add FastAPI for REST APIs
Create FastAPI Folder and Files
Manually create a folder named api inside course_project project:
Create Pydantic Schema
This file defines the Pydantic models (schemas) used by FastAPI for request validation and response serialization.
Unlike Django models (which define how data is stored in the database), Pydantic models describe how data should be structured, validated, and transferred between the API and the client.
Typical usage includes:
CourseBase: Shared attributes liketitle,description, etc.CourseCreate: For incoming data when creating a course.CourseUpdate: For modifying existing courses.Course: For outgoing responses, including theidfield.The
Configclass withfrom_attributes = Trueensures compatibility with Django ORM objects.
These schemas ensure that only valid data reaches your FastAPI routes and responses remain consistent.
#api/models.py  – Create Pydantic Schemas for FastAPI

from pydantic import BaseModel
from typing import Optional

class CourseBase(BaseModel):
    title: str
    description: str
    duration: str
    price: float

class CourseCreate(CourseBase):
    pass

class CourseUpdate(CourseBase):
    pass

class Course(CourseBase):
    id: int

    class Config:
        from_attributes = True  # use orm_mode=True if using Pydantic v1
Create FastAPI App
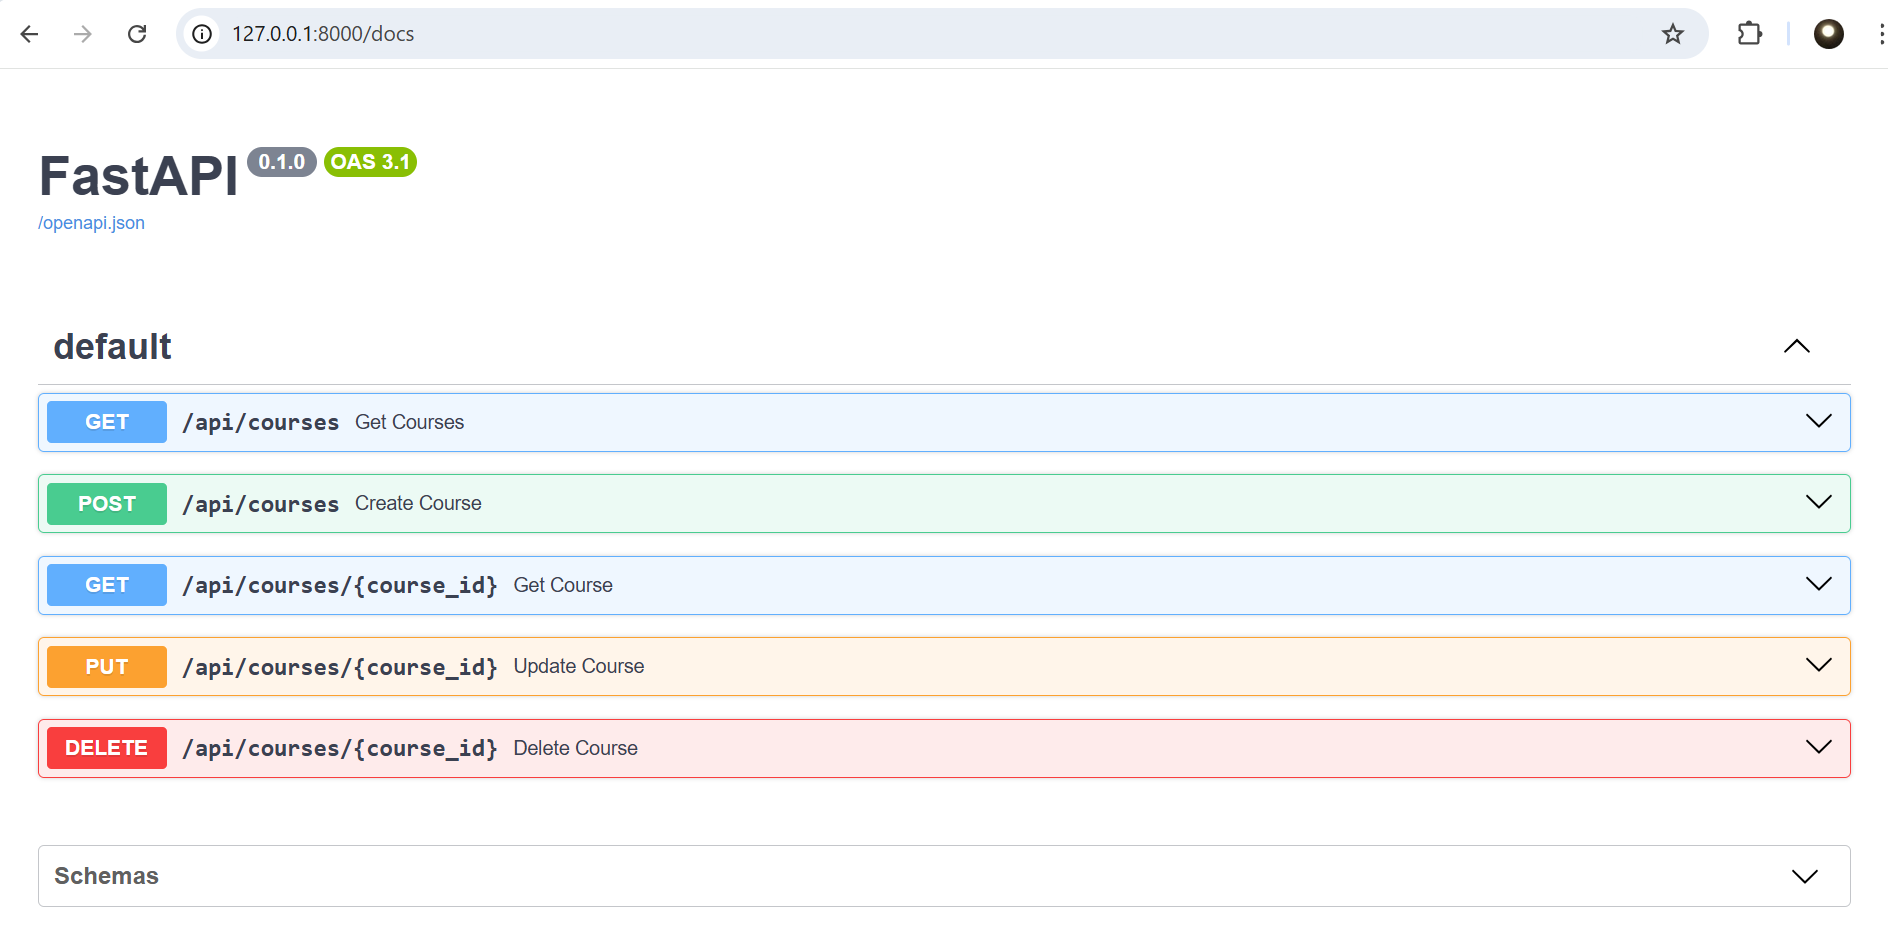
The api/main.py file acts as the main entry point for your FastAPI-powered REST API. It defines the FastAPI app instance, organizes API routes, and serves the OpenAPI documentation at /docs. This file is essential for setting up all FastAPI-specific functionality — like handling JSON requests, defining endpoints, and managing request/response validation via Pydantic models. By keeping it modular and separate from the Django code, we achieve a clean separation of concerns while still being able to integrate both using asgi.py.
# api/main.py

import os
import sys
import django

# Add project root to Python path
sys.path.append(os.path.dirname(os.path.dirname(os.path.abspath(__file__))))

# Setup Django environment
os.environ.setdefault("DJANGO_SETTINGS_MODULE", "course_project.settings")
django.setup()

# Import FastAPI and dependencies
from fastapi import FastAPI, HTTPException, status
from typing import List
from decimal import InvalidOperation

# Import Django model and Pydantic schemas
from courses.models import Course as DjangoCourse
from api.models import Course as CourseSchema, CourseCreate, CourseUpdate

# Initialize FastAPI app
app = FastAPI()

# Convert Django model instance to Pydantic schema
def to_pydantic(course: DjangoCourse) -> CourseSchema:
    return CourseSchema(
        id=course.id,
        title=course.title,
        description=course.description,
        duration=course.duration,
        price=float(course.price)
    )

# GET all courses
@app.get("/api/courses", response_model=List[CourseSchema])
def get_courses():
    validated_courses = []
    for course in DjangoCourse.objects.all():
        try:
            validated_courses.append(to_pydantic(course))
        except InvalidOperation as e:
            print(f"⚠️ Skipping invalid course: {course.title} | Reason: {e}")
        except Exception as e:
            print(f"⚠️ Unexpected error: {e}")
    return validated_courses

# GET course by ID
@app.get("/api/courses/{course_id}", response_model=CourseSchema)
def get_course(course_id: int):
    try:
        course = DjangoCourse.objects.get(id=course_id)
        return to_pydantic(course)
    except DjangoCourse.DoesNotExist:
        raise HTTPException(status_code=404, detail="Course not found")

# POST create new course
@app.post("/api/courses", response_model=CourseSchema, status_code=status.HTTP_201_CREATED)
def create_course(course_data: CourseCreate):
    try:
        course = DjangoCourse.objects.create(**course_data.dict())
        return to_pydantic(course)
    except Exception as e:
        raise HTTPException(status_code=500, detail=str(e))

# PUT update existing course
@app.put("/api/courses/{course_id}", response_model=CourseSchema)
def update_course(course_id: int, course_data: CourseUpdate):
    try:
        course = DjangoCourse.objects.get(id=course_id)
        for field, value in course_data.dict().items():
            setattr(course, field, value)
        course.save()
        return to_pydantic(course)
    except DjangoCourse.DoesNotExist:
        raise HTTPException(status_code=404, detail="Course not found")
    except Exception as e:
        raise HTTPException(status_code=500, detail=str(e))

# DELETE course
@app.delete("/api/courses/{course_id}", status_code=status.HTTP_204_NO_CONTENT)
def delete_course(course_id: int):
    try:
        course = DjangoCourse.objects.get(id=course_id)
        course.delete()
    except DjangoCourse.DoesNotExist:
        raise HTTPException(status_code=404, detail="Course not found")
    return {"message": "Course deleted successfully"}
Modify asgi.py to run both Django & FastAPI
To build a modern full-stack application that serves both dynamic HTML pages (via Django) and high-performance REST APIs (via FastAPI), we need to combine the two frameworks under a single ASGI (Asynchronous Server Gateway Interface) application. This integration allows you to serve Django-powered routes like /admin/ and /courses/, alongside FastAPI endpoints like /api/courses. Below is the asgi.py configuration that bootstraps Django, imports the FastAPI app, and mounts Django into FastAPI using WSGIMiddleware, so everything works seamlessly in one unified server process.
# course_project/asgi.py

import os
import django
from fastapi import FastAPI
from fastapi.middleware.wsgi import WSGIMiddleware
from django.core.asgi import get_asgi_application

# Set Django settings
os.environ.setdefault("DJANGO_SETTINGS_MODULE", "course_project.settings")
django.setup()

# Get Django ASGI app
django_app = get_asgi_application()

# Get FastAPI app from your main.py
from api.main import app as fastapi_app

# Mount Django app under root
fastapi_app.mount("/", WSGIMiddleware(django_app))

# This is the ASGI callable
app = fastapi_app
How to Run Both Django Views and FastAPI APIs Together
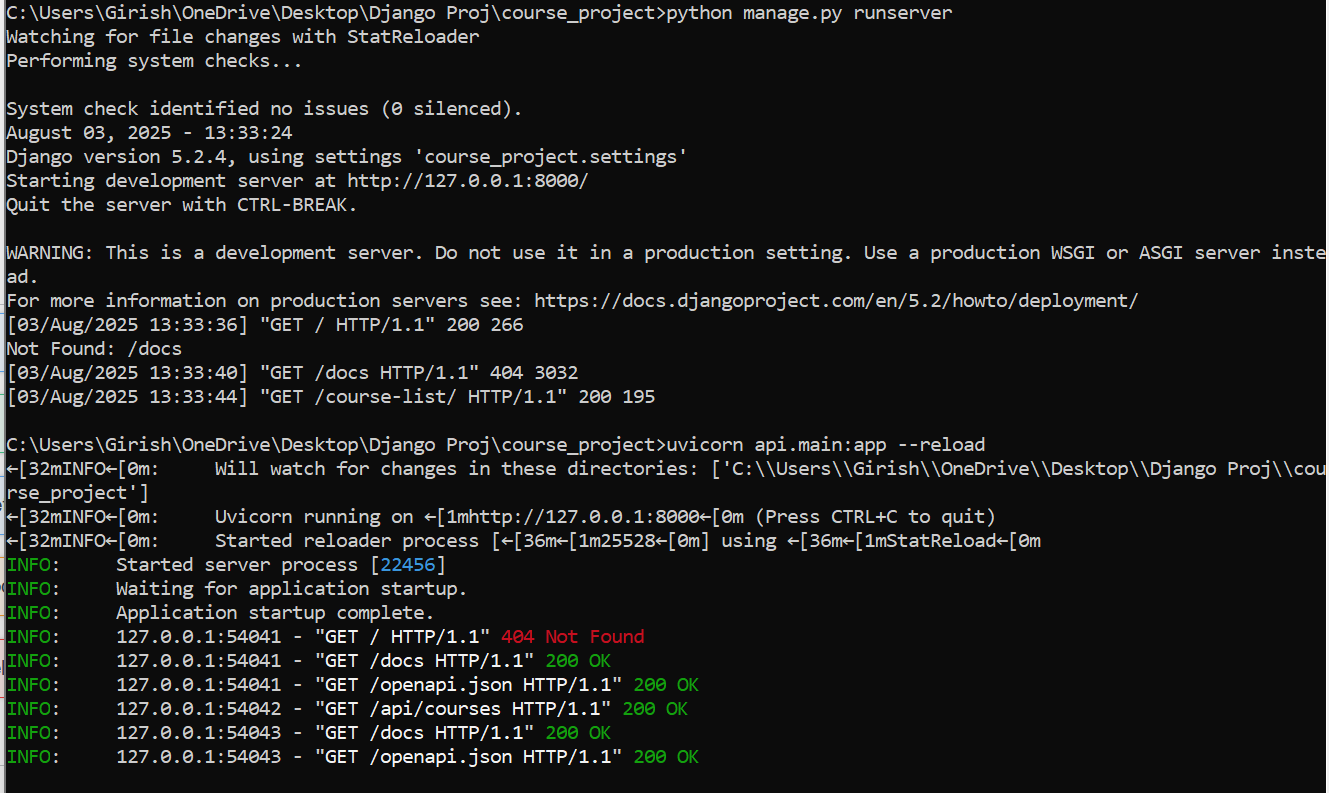
1. Django Server (For HTML pages like course-list, admin, etc.)
Command:
python manage.py runserverRuns at: http://127.0.0.1:8000
Handles:
HTML templates (e.g.,
course_list.html)Django Admin (
/admin/)Any route defined via Django
views.pyandurls.py

2. FastAPI Server (For API endpoints and Swagger docs)
Assuming your FastAPI entry file is api/main.py and it contains:
uvicorn api.main:app --reloadRuns at: http://127.0.0.1:8000
or another port if Django is using 8000
Handles:
/docs→ Swagger UI/openapi.jsonJSON API endpoints like
/api/courses, etc.
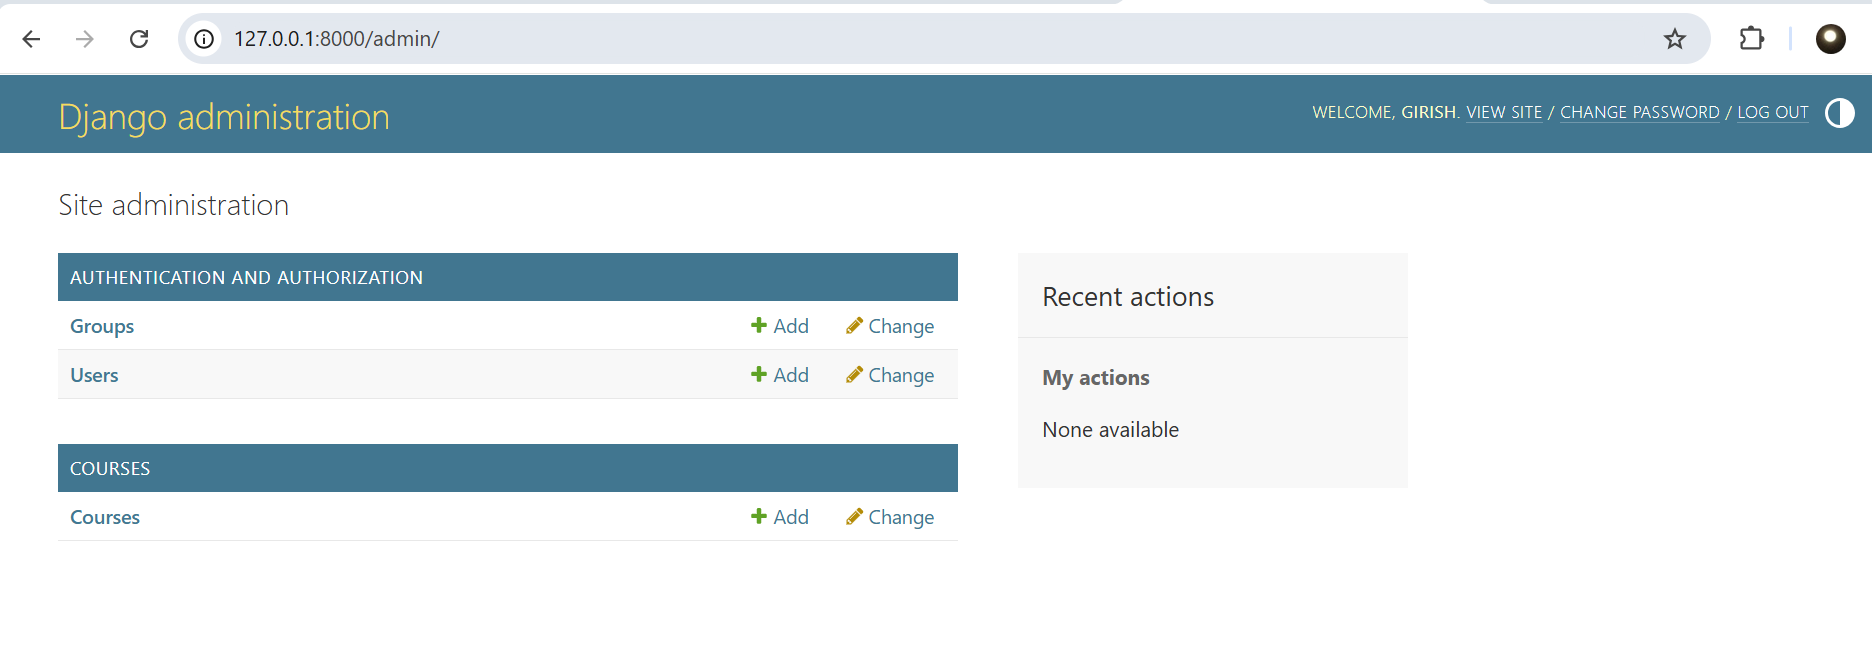
Step-by-Step: How to View and Use the Django Admin Panel
1. Ensure django.contrib.admin is in INSTALLED_APPS
In settings.py:
INSTALLED_APPS = [
    'django.contrib.admin',
    'django.contrib.auth',
    'django.contrib.contenttypes',
    'django.contrib.sessions',
    'django.contrib.messages',
    'django.contrib.staticfiles',
    'courses',  # your app
]
2. Create a Superuser (if not done yet)
python manage.py createsuperuserIt will ask for username, email, and password.
3. Register Your Model in admin.py
In courses/admin.py:
from django.contrib import admin
from .models import Course

admin.site.register(Course)
4. Run the Django Development Server
From your project root:
python manage.py runserver5. Open the Admin Panel in Browser
Visit:
http://127.0.0.1:8000/admin/6. Login with Superuser Credentials
Use the credentials you created earlier. After logging in, you’ll see the DjangoCourse model listed in the admin panel.
STATIC FILES HANDLING IN DJANGO – Complete Steps
This guide ensures static files (like CSS or images) are properly collected and served in development.
1. Folder Structure (Recommended)
Ensure this structure exists inside your Django app directory (courses/):
course_project/
│
├── courses/
│   ├── static/
│   │   └── courses/
│   │       ├── css/
│   │       │   └── style.css
│   │       └── js/
│   │           └── script.js
🔸 You can create static/courses/css/style.css manually if not already done.
2. Update settings.py
Add or check the following lines in your settings.py file:
# settings.py

import os

STATIC_URL = '/static/'

STATICFILES_DIRS = [
    os.path.join(BASE_DIR, 'courses/static'),
]

STATIC_ROOT = os.path.join(BASE_DIR, 'staticfiles')
🔔 STATICFILES_DIRS tells Django where to look for additional static files during development.
🔔 STATIC_ROOT is where collectstatic will copy files for production (you won’t use this folder manually).
3. Use Static in HTML Templates
In your templates/course_list.html (or any HTML file):
{% load static %}

<!DOCTYPE html>
<html>
<head>
    <title>Course List</title>
    <link rel="stylesheet" href="{% static 'courses/css/style.css' %}">
</head>
<body>
    <h1>Available Courses</h1>
    <ul>
        {% for course in courses %}
            <li>{{ course.title }} - ₹{{ course.price }}</li>
        {% endfor %}
    </ul>
</body>
</html>
4. Run collectstatic (Optional for Dev, Needed for Production)
Run the following only if you want to collect static files into staticfiles/ folder:
python manage.py collectstaticIt will move all static files from STATICFILES_DIRS into STATIC_ROOT.
✅ Note: For development, you don’t need to run
collectstaticevery time if you’re usingrunserver.
5. Serve Static Files in Development
When you run:
python manage.py runserverDjango will automatically serve static files in development mode.
DATABASE CONFIGURATION IN DJANGO
1. Default Setup (SQLite3)
By default, Django uses SQLite3, a lightweight file-based database suitable for development and small projects.
✅ In your settings.py:
DATABASES = {
    'default': {
        'ENGINE': 'django.db.backends.sqlite3',
        'NAME': BASE_DIR / "db.sqlite3",
    }
}ENGINE: Django backend engine (here it’s SQLite)NAME: Path to the.sqlite3file
✔️ You don’t need to install any additional drivers for SQLite — it’s built into Python.
2. Switching to Another Database (e.g., PostgreSQL)
To switch to PostgreSQL (or any other supported database), follow these steps:
A. Install the Database Driver
For PostgreSQL:
pip install psycopg2-binaryFor MySQL:
pip install mysqlclientFor MariaDB (Python 3.8+):
pip install mariadbB. Update DATABASES in settings.py
✅ Example: PostgreSQL
DATABASES = {
    'default': {
        'ENGINE': 'django.db.backends.postgresql',
        'NAME': 'coursedb',
        'USER': 'your_db_user',
        'PASSWORD': 'your_password',
        'HOST': 'localhost',
        'PORT': '5432',
    }
}
✅ Example: MySQL
DATABASES = {
    'default': {
        'ENGINE': 'django.db.backends.mysql',
        'NAME': 'coursedb',
        'USER': 'your_db_user',
        'PASSWORD': 'your_password',
        'HOST': 'localhost',
        'PORT': '3306',
    }
}
C. Create the Database (Manually)
Use your database admin tool (e.g., psql, MySQL CLI, or phpMyAdmin) to create an empty database named coursedb.
D. Run Migrations
python manage.py makemigrations
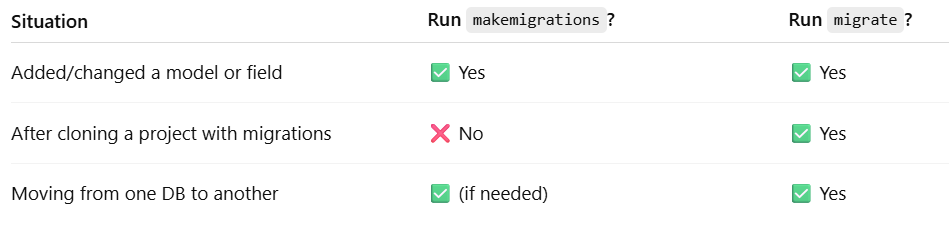
python manage.py migrateWhat is makemigrations?
python manage.py makemigrationsIt creates migration files based on the changes you've made in your
models.py.These migration files are Python scripts that describe what changes should happen in the database (e.g., create a table, add a column).
It doesn’t touch the database yet — it just prepares the plan.
🛠️ Example:
If you add a new model Course with fields, makemigrations will generate a migration file like:
# 0001_initial.py
migrations.CreateModel(
    name='Course',
    fields=[
        ('id', models.AutoField(...)),
        ('title', models.CharField(...)),
        ...
    ]
)
What is migrate?
python manage.py migrateIt applies the migrations to the actual database.
This means Django will create/update/delete tables and columns based on the migration files.
It ensures your database schema is in sync with your models.
📦 Django also keeps a table called django_migrations in your database to track what migrations have already been applied.
Analogy
Think of makemigrations as writing a blueprint, and migrate as using that blueprint to build or modify the real house (database).
When Should You Run Them?
FAQ’s
1. Why do we add __init__.py?
The file __init__.py is used to tell Python that a directory is a package — that is, a module that can be imported.
Package Recognition
Allows Imports to Work
Initialization Code (optional)
Support for Submodules
__init__.pyis essential in older Python versions and still recommended today for clear structure and import support.
In this project, bothapi/andcourses/should have it to support:Local module imports
FastAPI/Django recognizing modules correctly
Cleaner, error-free import statements
2. What is Pydantic?
Pydantic is a Python library that provides data validation and settings management using Python type annotations.
🔐 It ensures that data entering your FastAPI app (via requests) is valid, correctly typed, and safe to use.
3. What are Pydantic Models?
A Pydantic model is a class that inherits from pydantic.BaseModel. It is used to define the structure and type of data you expect in requests or responses.
Benefits of Pydantic in FastAPI
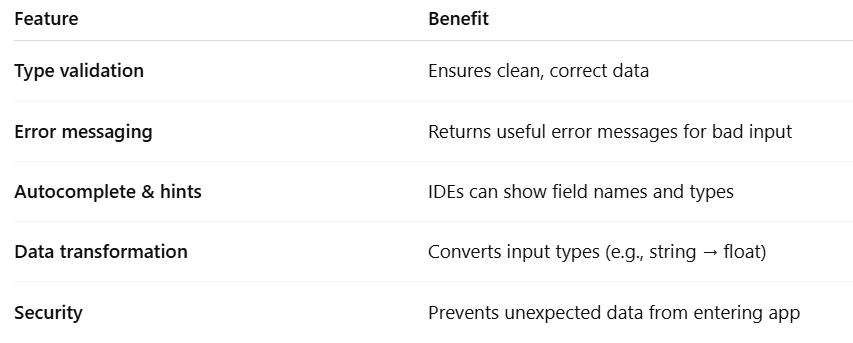
BaseModel: Base class for Pydantic models
Request Model: Validates incoming request body
Response Model: Ensures consistent outgoing schema
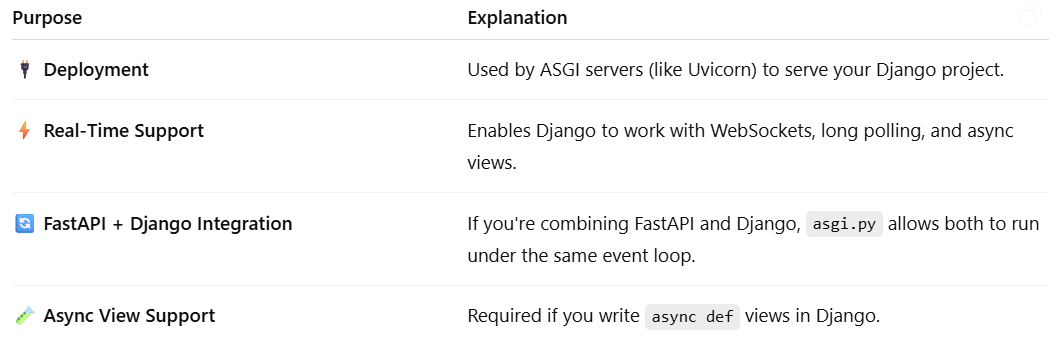
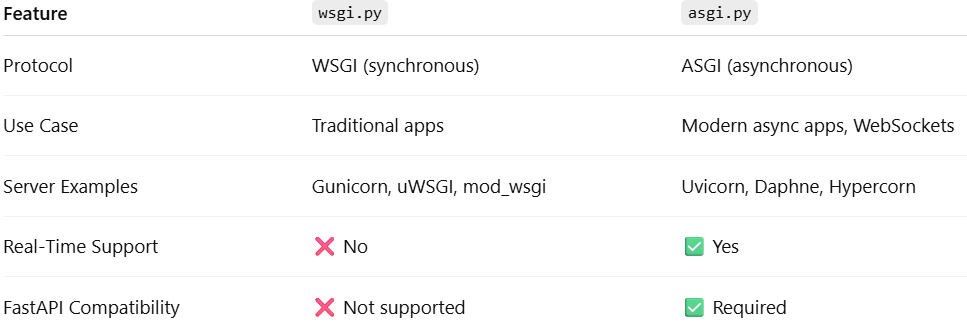
4. What is asgi.py in Django?
The asgi.py file is a configuration entry point for deploying your Django application using an ASGI server like Uvicorn, Daphne, or Hypercorn.
ASGI = Asynchronous Server Gateway Interface
It is the asynchronous version of WSGI (Web Server Gateway Interface).
Enables handling async requests, websockets, background tasks, and real-time features.
Designed to support modern Python web apps that need more than just HTTP.
Why Do We Need asgi.py?
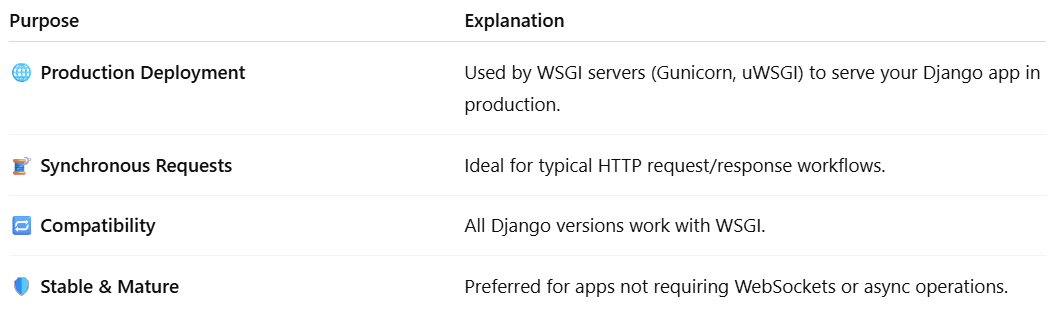
5. What is wsgi.py in Django?
The wsgi.py file is the WSGI (Web Server Gateway Interface) entry point for running your Django application using traditional synchronous web servers like Gunicorn, uWSGI, or mod_wsgi with Apache/Nginx.
WSGI = Web Server Gateway Interface
WSGI is a Python standard (PEP 3333) that describes how a web server communicates with web applications.
It is synchronous, designed before Python had built-in async capabilities.
Why Do We Need wsgi.py?
6. Difference: wsgi.py vs asgi.py?
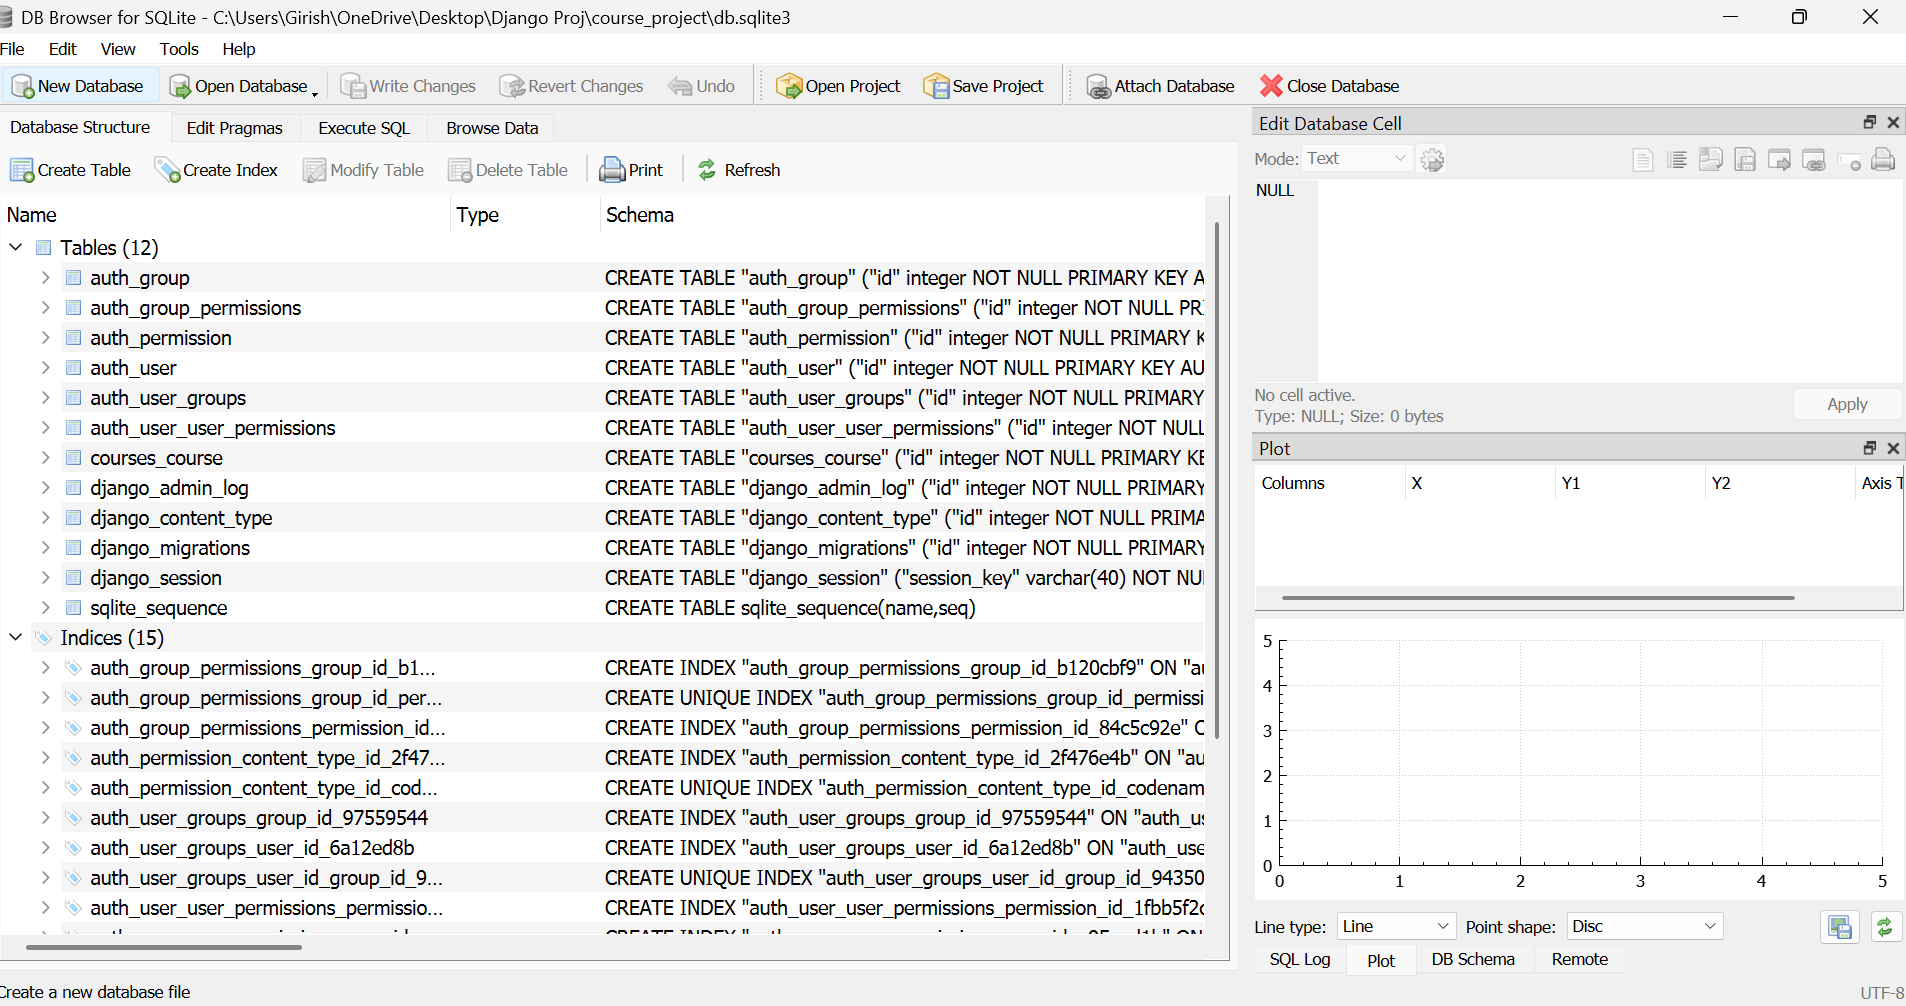
7. How can I view the contents of the db.sqlite3 database?
You can use DB Browser for SQLite — a free, open-source tool that provides a graphical interface to inspect and manage your SQLite database.
Steps:
Install DB Browser for SQLite from sqlitebrowser.org.
Open the app and choose File → Open Database.
Navigate to your project directory and select
db.sqlite3.You can now browse tables, view data, and run SQL queries visually.
📝 This is especially useful to verify if data is being stored correctly when testing Django models and APIs.
8. How do I set up a virtual environment and install required libraries for this project?
To get started with a clean environment and ensure all dependencies are installed correctly, follow the step-by-step instructions in my article:
🔗 Getting Started with Django: A Simple Guide to Building Your First Web App
The guide covers:
Creating and activating a virtual environment
Installing Django, FastAPI, and other dependencies
Basic project setup and structure
This is ideal for beginners and helps avoid common setup mistakes.
Final Thoughts
You now have a powerful hybrid setup combining:
✅ Django for HTML rendering, admin interface, and templating
✅ Django ORM + SQLite for easy database operations
✅ FastAPI for modern, high-performance REST APIs
This project is an ideal foundation for blending a monolithic architecture (Django views, admin, templates) with microservices architecture (FastAPI APIs) — all in one unified application.
For more in-depth technical insights and articles, feel free to explore:
Girish Central
LinkTree: GirishHub – A single hub for all my content, resources, and online presence.
LinkedIn: Girish LinkedIn – Connect with me for professional insights, updates, and networking.
Ebasiq
Substack: ebasiq by Girish – In-depth articles on AI, Python, and technology trends.
Technical Blog: Ebasiq Blog – Dive into technical guides and coding tutorials.
GitHub Code Repository: Girish GitHub Repos – Access practical Python, AI/ML, Full Stack and coding examples.
YouTube Channel: Ebasiq YouTube Channel – Watch tutorials and tech videos to enhance your skills.
Instagram: Ebasiq Instagram – Follow for quick tips, updates, and engaging tech content.
GirishBlogBox
Substack: Girish BlogBlox – Thought-provoking articles and personal reflections.
Personal Blog: Girish - BlogBox – A mix of personal stories, experiences, and insights.
Ganitham Guru
Substack: Ganitham Guru – Explore the beauty of Vedic mathematics, Ancient Mathematics, Modern Mathematics and beyond.
Mathematics Blog: Ganitham Guru – Simplified mathematics concepts and tips for learners.